

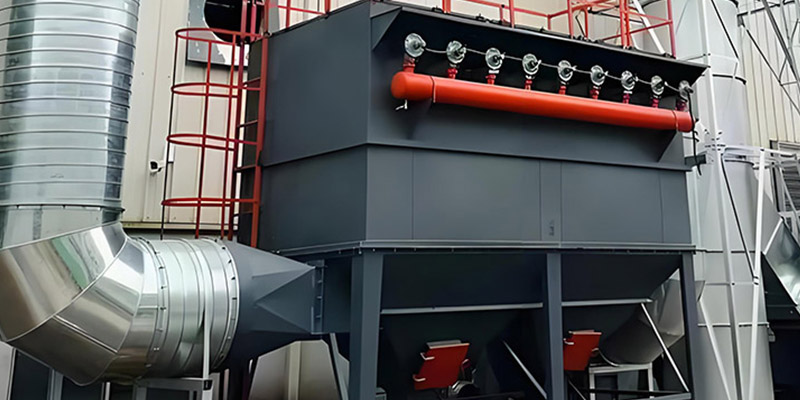
I. What is a Baghouse?
A baghouse is a dry dust filtration device. It captures fine, dry, non-fibrous dust. The filter bags consist of woven or non-woven felt fabric. These bags use a fiber fabric’s filtering action to clean dusty gas. When dusty gas enters the baghouse, large, heavy dust particles fall into the hopper due to gravity. Meanwhile, the gas containing finer dust passes through the filter material. Consequently, the filter material traps the dust, which cleans the gas.
1) Working Principle
The bag filter works by using its internal bags to remove dust from gas. This process mechanically intercepts dust particles. During this interception, clean air exits from the other end. The collected dust accumulates on the bags. Periodically, a cleaning system dislodges this dust into the hopper. Finally, a discharge system removes the dust.
2) Factors Affecting Lifespan
Two main factors influence the baghouse dust collector’s service life.
First, the dust cleaning frequency affects longevity. Typically, a filter bed sits above the bags to extend their life. Excessive cleaning frequency can damage the bags. Therefore, this damage shortens the dust collector’s life. Operators must set the cleaning frequency correctly.
Second, proper bag management is crucial. Storage must prevent moisture and direct sunlight to avoid bag deterioration. Furthermore, installers must enforce strict fire prevention measures during installation. Additionally, they must control the flue gas temperature within a specific range. These steps ensure the bag filter operates normally.
II. Common Baghouse Issues and Solutions
Installation and operation often involve minor problems. These issues can severely reduce the bag filter’s efficiency and cause economic losses. Therefore, ensuring proper installation and avoiding unnecessary problems is vital.
1) Support Structure Installation
The support structure forms the baghouse foundation. Normally, workers weld the “base column bottom to the embedded foot plate.” However, construction can cause embedded plate errors. Thus, installers must adjust the column verticality. Otherwise, they cannot guarantee the baghouse frame dimensions. Usually, the factory welds the stiffening plate below the column. Consequently, fixing this issue on-site is very difficult.
-
Solution: Workers can cut the factory-welded column and stiffening plate apart. Next, they adjust the column verticality. Then, they re-weld the components together. Finally, they weld the embedded plate. During installation, they use tape measures, levels, and centerlines for alignment. Most importantly, the welding quality must meet standards.
2) Hopper Fabrication and Installation
The hopper is a critical component. The baghouse collects dust in the hopper for later disposal. Therefore, proper hopper installation is important. However, factories often ship hopper parts for on-site assembly to save transport space and cost. Consequently, site conditions and space limitations complicate hopper installation. Moreover, transporting large hopper sheets increases costs and risks deformation, further increasing difficulty.
-
Solution: Manufacturers can divide the hopper into two sections. Additionally, they should stagger the surrounding seams. This method improves installation strength and hopper quality while significantly reducing difficulty.
3) Ensuring Internal Cleanliness
Baghouse installation involves extensive welding and temporary internal supports. After installation, workers must remove the discharge valve below the hopper. Then, they thoroughly clean the dust collector’s interior. Finally, they reinstall the discharge valve. Otherwise, the valve may clog during operation, disrupting the bag filter’s normal function.
4) Shell Installation
The shell includes the bottom ring beam, columns, top beam, and side plates. Site restrictions often affect shell installation. Workers typically lift the bottom ring beam into place on the supports and then assemble it. Because the shell is large, moving it after ground assembly is difficult.
The tube sheet installation is crucial. It requires high air tightness. Therefore, using a punching method to create holes prevents tube sheet deformation. Furthermore, workers can use a water tightness principle to check air tightness. This approach solves minor issues and ensures quality.
5) Pulse Valve Installation
Leakage often occurs during pulse valve installation. Primary reasons include:
First, a gap exists between the pulse valve and the air tank connection, causing leaks.
Second, the air tank structure has issues. This problem can connect the internal and external spaces via bolt holes, leading to leakage.
-
Solution: During installation, adjust the gasket under the pulse valve based on the air tank to change the diameter. For bolt-related issues, simply replace them. These adjustments ensure proper pulse valve and baghouse installation quality.
III. Common Baghouse Faults and Troubleshooting
1. High Differential Pressure
-
Causes & Solutions:
-
Incorrect Reading: Clean pressure ports. Check hoses for cracks. Inspect the gauge.
-
Incorrect Pulse Jet Settings: Increase frequency. Raise compressed air pressure if too low. Check/clean the dryer if needed. Check for line blockages.
-
Solenoid Valve Failure: Inspect the diaphragm valve. Check the control solenoid.
-
Pulse Controller Failure: Check controller indicators and output terminals.
-
Clogged Filter Bags: Address bag condensation (see below). Send bags for lab analysis. Dry and clean bags, or replace them. Reduce air volume. Increase air pressure. Increase cleaning frequency. Inject neutral conditioner to form a protective, porous dust cake.
-
Excessive Re-entrainment: Empty the hopper continuously. Use random cleaning sequence, not sequential. Ensure the inlet damper is clean.
-
2. Low Fan Motor Current / Low Air Volume
-
Causes & Solutions:
-
High Baghouse Pressure Drop: See above.
-
Reversed Fan/Motor Pulleys: Check drawings; correct pulley connection.
-
Dust-Clogged Ducts: Clean ducts; check air velocity.
-
Closed Fan Damper: Open and lock the damper.
-
Closed Riser Valve: Check the air circuit; open the valve plate.
-
High System Static Pressure: Measure static pressure at fan ends; adjust per design specs. Check/replace poorly designed high-velocity ducts.
-
Fan Not Meeting Design: Ensure smooth airflow at fan inlet. Check/repair/replace worn blades.
-
Fan Rotation Reversed: Reverse motor wiring.
-
3. Dust Escaping from Pickup Points
-
Causes & Solutions:
-
Low Air Volume: See above.
-
Duct Leakage: Seal cracks preventing dust bypass.
-
Incorrect Duct Balancing: Adjust branch dampers.
-
Poor Hood Design: Enclose open areas around pickup. Check if plain suction hoods overcome suction. Check if belts carry dust out of hoods.
-
4. Dust Discharge from Stack
-
Causes & Solutions:
-
Bag Leaks: Replace torn/holed bags. Ensure tight spring圈 (spring圈) installation.
-
Tube Sheet Leaks: Seal gaps or welds.
-
Insufficient Dust Cake: Lower air pressure. Reduce cleaning frequency. Inject conditioner for primary cake.
-
Excessive Bag/Element Porosity: Conduct permeability tests; consult the manufacturer.
-
5. Severe Fan Wear
-
Causes & Solutions:
-
Fan Handling Excess Dust: See above.
-
Unsuitable Fan: Confirm suitability for duty; consult manufacturer.
-
Excessive Fan Speed: Consult manufacturer.
-
6. Severe Fan Vibration
-
Causes & Solutions:
-
Dust on Impeller: Clean impeller. Check for excess dust handling. Check fan location. Drain condensation/moisture; keep fan dry.
-
Unsuitable Impeller: Consult manufacturer.
-
Unbalanced Pulley: Perform dynamic balancing.
-
Worn Bearings: Replace them.
-
7. High Compressed Air Consumption
-
Causes & Solutions:
-
Frequent Cleaning Cycle: Lengthen the cycle if possible.
-
Long Pulse Duration: Reduce duration (wastes air after initial pulse; typically 0.1 sec).
-
Excessive Pressure: Check diaphragm and spring (see valve failure analysis).
-
Air Leakage: Perform bubble test and repair.
-
8. Low Compressed Air Pressure
-
Causes & Solutions:
-
High Consumption: See above.
-
Line Restriction: Check for blockages.
-
Clogged Dryer: Replace desiccant or bypass dryer if conditions allow.
-
Worn Compressor: Consult manufacturer or check maintenance manual.
-
9. Excessive Air Volume
-
Causes & Solutions:
-
Duct Leakage: Seal cracks.
-
Insufficient Static Pressure: Close dampers. Reduce fan speed.
-
10. Low Compressed Air Consumption
-
Causes & Solutions:
-
Pulse Valves Not Working: Check valves as described.
-
Controller Failure: Check terminal output as described.
-
11. Early Bag Failure – Decomposition
-
Causes & Solutions:
-
Unsuitable Filter Media: Analyze gas chemistry; consult manufacturer.
-
Media Unsuitable for Gas Components: Pre-treat gas; or replace bags/elements.
-
Operation Below Acid Dew Point: Increase gas temperature.
-
12. High Bag Failure – Excessive Wear
-
Causes & Solutions:
-
Worn-out Baffle: Replace the baffle.
-
Excessive Dust: Install a primary collector.
-
Frequent Cleaning: Extend cycle time.
-
Poor Air Distribution: Consult manufacturer.
-
Dust in Clean Air Plenum/ Tube Sheet: Clean tube sheet and bag/element interiors. Use fluorescent test to find leaks.
-
Burrs/Corrosion on Cages: Remove burrs; replace if needed. Consider coated cages for corrosion.
-
13. High Bag Failure – Burning
-
Causes & Solutions:
-
Thermal Stratification: Use baffles in ducts to prevent turbulence.
-
Sparks Entering Baghouse: Install a spark arrester.
-
Faulty Thermocouple: Replace and find the cause.
-
Cooling System Failure: Check design specs; consult manufacturer.
-
14. Moisture Inside Baghouse
-
Causes & Solutions:
-
Insufficient Heating: Introduce hot air before starting process gas.
-
No Post-operation Purging: Run fan for 15-20 minutes after shutdown.
-
Casing Temperature Below Dew Point: Raise gas temperature. Insulate the unit. Reduce system moisture to lower dew point.
-
Ambient Air Infiltration: Check casing for leaks and door seals for wear.
-
Cold Bridges in Insulation: Avoid uninsulated metal penetrations.
-
Water in Compressed Air: Check automatic drain. Install an aftercooler or dryer.
-
Poor Process Conditions: Inject conditioning agent.
-
15. Material Bridging in Hopper
-
Causes & Solutions:
-
Internal Moisture: See above.
-
Poor Hopper Design: Install sonic horns or vibrators to promote flow.
-
Dust Accumulation in Hopper: Empty continuously; avoid storing dust.
-
Small Discharge Opening: Use a wide, fluted discharge flange; check if the feeder/rotary valve is faulty or undersized.
-
V. Routine Baghouse Checkpoints
-
Ducts: Check for corrosion, holes, or external damage. Look for loose bolts, cracked welds, and dust accumulation (especially in straight sections and reducers).
-
Solenoid/Pulse Valves: Check for correct operation; listen for air pulse sound.
-
Pressure Reducing Valve: Check for leaks. Note potential internal debris.
-
Fan: Ensure secure, level mounting and regular lubrication. Watch for dust buildup on blades.
-
Compressed Air System: Check correct compressor lubrication. Look for cracks on air tanks and pipes. Note pressure gauge readings (if installed). Drain air compressor and tanks.
-
Access Doors: All doors should seal tightly. Check seals for looseness, breaks, or wear. Replace as needed.
-
Inlet/Deflector Baffles: Check for excessive wear or corrosion.
-
Air Regulator & Riser Valves: Check lubricators (if equipped) for proper function.
The above lists common operational faults in baghouse dust collectors. Effective daily maintenance, along with timely identification and resolution of potential faults, ensures stable operation and improves dust removal efficiency.

